This step-by-step guide will teach you how to set up a Logi Analytics multi-tenant environment with separate databases for each tenant! First, it’s important to explain the difference between a single-tenant and multi-tenant environment. In a single-tenant environment, each customer has his or her own independent database and instance of the application. There is no sharing happening in this setup. Single-tenant environments are ideal for clients that deploy their Logi Analytics application on-prem or if they have customer-specific reports.

In many situations, it can be beneficial to have a multi-tenant setup. With multi-tenancy, a single application and its supporting infrastructure serves multiple customers. Each customer shares the application but still has their own database. Each tenant’s data is isolated and remains invisible to other tenants. Multi-tenant environments result in lower costs due to economies of scale and shared infrastructure. These environments are easier to update, and configuration can be done while leaving the underlying codebase unchanged. Multi-tenant environments are also better for cloud and SaaS deployment.

Regardless of the reason why you’re using a multi-tenant environment, let’s get started with the setup explanation! There are two approaches: you can create a Logi Analytics Process to set your session variables and update the connection string or use a PlugIn to create a new connection string.
Option 1: Creating a Logi Analytics Process
StartUpProcess runs a Task in a Process definition. When StartUpProcess is in the Settings definition, it runs with each user’s session start, or optionally with just the first session. When StartUpProcess is in a Report definition, it runs at the beginning of the report generation.
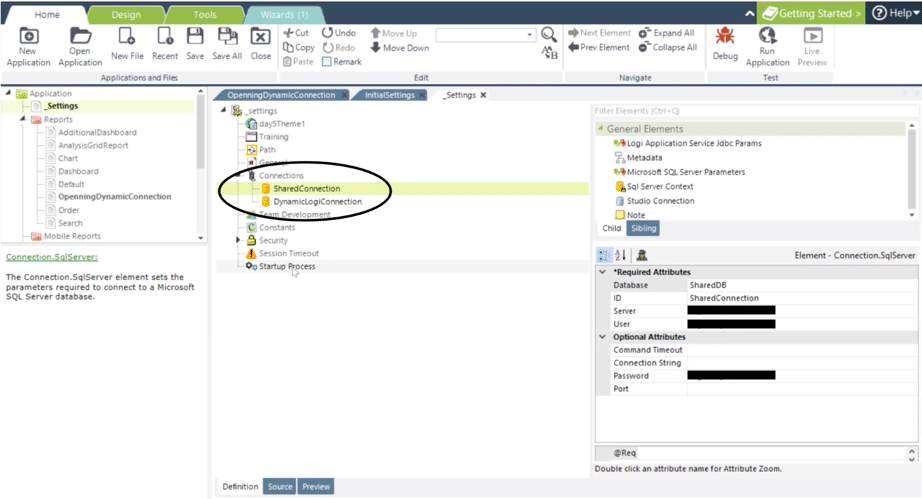
In the _Settings file you need to add two DB Connections:
- The first DB Connection will be shared and will contain the information for all the tenant-specific database connections.
- The second DB Connection will be dynamic and will use the tenant’s details from the first DB to set the connection.

You also need to create a process in your Logi Analytics application. After you’ve created the process, you need to add the StartUpProcess element to your Settings file. Then, point it to the Logi Analytics process that you just created.
In the process, you need to create the task that will be responsible for setting up the connection string dynamically. In our example, we added a SQL DataLayer that is using the connection to a shared data source that is defined in the Settings file. We are using this source to get the result set for a specific tenant.
The DataLayer will return the connection-specific records based on the provided tenant. We are using the @tenant_id parameter inside of the SQL command to control the result set. The @tenant_id parameter is specified in the SqlParamater Logi Analytics element, in the embedded model the value for the parameter will be set by the parent application. The parent application will send the tenant ID to distinguish between tenants.
After the DataLayer is processed, the returned values can be referenced by using a @Data Logi Analytics token. Based on the result from the Datalayer, you need to set the @Session variables that will be used to set up the connection to the database. The variables that you need to set are Database, Server, User, and Password. Once the startup process is finished, the connection will use the session variables that were created in the process.

After you’ve completed this, your application should be able to set up the connection string dynamically using the startup process.
Option 2: Plugin
Plugin is a .NET library assembly (a DLL) or Java .JAR file containing custom code that performs actions while each request is processed. Plugins can dynamically modify Definitions and have full access to web request, application, session, and response objects. A Plugin gives Logi Analytics developers the ability to programmatically extend the functionality of their Logi Analytics applications. With Plugins, developers can dynamically change the behavior of Logi Analytics reports at runtime by accessing request and session variables and modifying report definitions.
To support dynamic connection strings, a Plugin Call element is used in the _Settings definition to retrieve the connection string (or other values) from a session variable. This then dynamically modifies the _Settings definition by inserting the connection string value. The plugin runs on the LoadDefinition event and therefore alters the definition before it is processed.
To use a Plugin, you simply add the Plugin Call to your Settings Definition file. The Plugin is loaded as a library along with the application and runs under the application’s process on the web server. When adding the PluginCall to the _Settings file, the Plugin will execute the custom code that performs actions while each request is processed.

To set the connection string dynamically by using the Plugin you will need to add a Plugin Call element to the _Settings Definition file with the following required attributes: Assembly Name, Class Type Name, Event, and Method. In the event attribute, you must specify when to call your Plugin. A PlugIn has the following Event options: FinishHtml, FinishData, and LoadDefinition.
To set up the database connection in _Settings dynamically, you will need to select the ‘LoadDefinition’ Event. With the ‘LoadDefinition’ Event, the Plugin is called when the definition file is loaded. The Plugin may change the definition XML; adding, removing, or changing elements. You’ll also need to specify the Plugin parameters, which are variable that you can pass into the Plugin Call element’s Method. In the Plugin Call, we are passing the Plugin parameters, which includes tenant ID and tenant name. Based on these variables, the Plugin sets the connection-specific session variables that we are using in the connection.
The connection string is being modified dynamically by the Plugin that is called in the _Settings definition. The Plugin is setting the different connection strings based on the current tenant.
We hope that one of these approaches worked for you! Please feel free to reach out or comment if you have any questions.


