Earlier this year, we wrote a blog about how to use AWS Auto Scaling with Logi Analytics Applications. In that blog, we promised to release a step-by-step guide outlining the technical details of how a Logi Application can be configured to harness the scalability and elasticity features of AWS. If you were wondering when that would be released, the wait is over and you have come to the right place! Without further ado…

Enabling a multi-web server Logi application on AWS Windows instances requires the right configuration for some of the shared Logi files (cache files, secure key, bookmarks, etc.). To support these shared files, we need a shared network drive that can be accessed by the different Logi webservers. Currently EFS (Elastic File Storage) is not supported on Windows on AWS. Below we have defined how EFS can be mounted on Windows servers and setup so that you can utilize the scalability feature of Logi.
Setting Up the File Server
Overview:
In order for our distributed Logi application to function properly, it needs access to a shared file location. This can be easily implemented with Amazon’s Elastic File System (EFS). However, if you’re using a Windows server to run your Logi application, extra steps are necessary, as Windows does not currently support EFS drives. In order to get around this constraint, it is necessary to create Linux based EC2 instances to serve as an in-between file server. The EFS volumes will be mounted on these locations and then our Windows servers will access the files via the Samba (SMB) protocol.
Steps:
- Create EC2
- Follow the steps as outlined in this AWS Get Started guide and choose:
- Image: “Ubuntu Server 16.04 LTS (HVM), SSD Volume Type”
- Create an Instance with desired type e.g.: “t2.micro”
- Follow the steps as outlined in this AWS Get Started guide and choose:
- Create AWS EFS volume:
- Follow the steps listed here and use same VPC and availability zone as used above
- Setup AWS EFS inside the EC2:
- Connect to the EC2 instance we created in Step 1 using SSH
- Mount the EFS to the EC2 using the following commands:
sudo apt-get install -y nfs-common
mkdir /mnt/efs
mount -t nfs4 -o nfsvers=4.1,rsize=1048576,wsize=1048576,hard,timeo=600,retrans=2 EFS_IP_ADDRESS_HERE:/ /mnt/efs
- Re-export NFS share to be used in Windows:
- Give our Windows user access to its files. Let’s do this using samba. Again, drop the following to your shell for installing SMB(Samba) services in your Ubuntu EC2
- Run the following commands:
apt-get install -y samba samba-common python-glade2 system-config-samba
cp -pf /etc/samba/smb.conf /etc/samba/smb.conf.bak
cat /dev/null -> /etc/samba/smb.conf
nano /etc/samba/smb.conf - And then, paste the text below inside the smb.conf file:
[global]
workgroup = WORKGROUP
server string = AWS-EFS-Windows
netbios name = ubuntu
dns proxy = no
socket options = TCP_NODELAY[efs]
path = /mnt/efs
read only = no
browseable = yes
guest ok = yes
writeable = yes - Create a Samba user/password. Use the same credentials as your EC2 user
sudo smbpasswd –a ubuntu - Give Ubuntu user access to the mounted folder:
sudo chown ubuntu:ubuntu /mnt/efs/ - And finally, restart the samba service:
sudo /etc/init.d/smbd restart
Setting up the Application Server
Overview:
Logi applications require setup in the form of settings, files, licenses, and more. In order to accommodate the elastic auto-scaling, we’ll set up one server – from creation to connecting to our shared drive to installing and configuring Logi – and then make an Amazon Machine Image (AMI) for use later.
Steps:
- Create EC2:
- Follow the steps as outlined in this AWS Get Started guide and choose:
- Image: “Microsoft Windows Server 2016 Base”
- Instance type: “t2.micro” or whatever type your application requires
- Follow the steps as outlined in this AWS Get Started guide and choose:
- Deploy code:
- Clone your project repository and deploy the code in IIS
- Set Up User Access:
- Allow your application in IIS to access the shared folder (EFS) that we created inside the File server
- From the control panel, choose users accounts → manage another account → add a user account
- Use same username and password we created for the samba user in Ubuntu file server
- In IIS, add the new Windows user we created above to the application connection pool, IIS → Application Pools → right click on your project application pool → identity → custom account → fill in the new username and password we created earlier.
- Test EFS (shared folder) connection:
- To test the connection between Windows application server and Ubuntu file server, go to:
- This PC → computer tap → map network drive → in folder textbox type in “\\FILE_SERVER_IP_ADDRESS\efs” → If credentials window appears for you, just use the new username and password we created earlier.
- To test the connection between Windows application server and Ubuntu file server, go to:
Configuring the Logi Application
Sticky and Non-Sticky Sessions
In a standard environment with one server, a session is established with the first HTTP request and all subsequent requests, for the life of the session, will be handled by that same server. However, in a load-balanced or clustered environment, there are two possibilities for handling requests: “sticky” sessions (sometimes called session affinity) and “non-sticky” sessions.
Use a sticky session to handle HTTP requests by centralizing the location of any shared resources and managing session state. You must create a centralized, shared location for cached data (rdDataCache folder), saved Bookmark files, _metaData folder, and saved Dashboard files because they must be accessible to all servers in the cluster.
Managing Session State
IIS is configured by default to manage session information using the “InProc” option. For both standalone and load-balanced, sticky environments, this option allows a single server to manage the session information for the life of the session.
Centralization of Application Resources
In a load-balanced environment, each web server must have Logi Server installed and properly licensed, and must have its own copy of the Logi application with its folder structure, system files, etc. This includes everything in the _SupportFiles folder such as images, style sheets, XML data files, etc., any custom themes, and any HTML or script files. We will achieve this by creating one instance with all the proper configurations, and then using an AMI.
Some application files should be centralized, which also allows for easier configuration management. These files include:
Definitions: Copies of report, process, widget, template, and any other necessary definitions (except _Settings) can be installed on each web server as part of the application, or centralized definitions may be used for easier maintenance (if desired).

The location of definitions is configured in _Settings definition, using the Path element’s Alternative Definition Folder attribute, as shown above. This should be set to the UNC path to a shared network location accessible by all web servers, and the attribute value should include the _Definitions folder. Physically, within that folder, you should create the folders _Reports, _Processes, _Widgets, and _Templates as necessary. Do not include the _Settings definition in any alternate location; it must remain in the application folder on the web server as usual.
“Saved” Files: Many super-elements, such as the Dashboard and Analysis Grid, allow the user to save the current configuration to a file for later reuse. The locations of these files are specified in attributes of the elements.
As shown in the example above, the Save File attribute value should be the UNC path to a shared network location (with file name, if applicable) accessible by all web servers.
Bookmarks: If used in an application, the location of these files should also be centralized:
As shown above, in the _Settings definition, configure the General element’s Bookmark Folder Location attribute, with a UNC path to a shared network folder accessible by all web servers.
Using SecureKey security:
If you’re using Logi SecureKey security in a load-balanced environment, you need to configure security to share requests.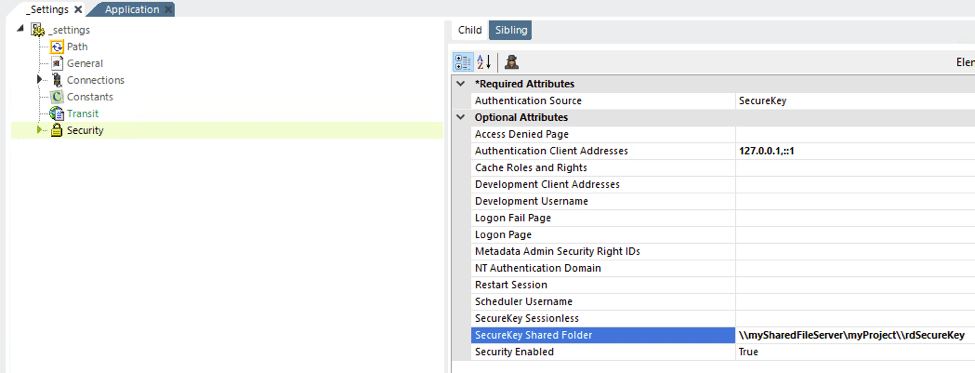
In the _Settings definition, set the Security element’s SecureKey Shared Folder attribute to a network path, as shown above. Files in the SecureKey folder are automatically deleted over time, so do not use this folder to store other files. It’s required to create the folder rdSecureKey under myProject shared folder, since it’s not auto created by Logi.
Note: “Authentication Client Addresses” must be replaced later with subnet IP addresses ranges of the load balancer VPC after completing the setup for load balancer below.
You can Specify ranges of IP addresses with wildcards. To use wildcards, specify an IP address, the space character, then the wildcard mask. For example to allow all addresses in the range of 172.16.*.*, specify:
172.16.0.0 0.0.255.255
Centralizing the Data Cache
The data cache repository is, by default, the rdDataCache folder in a Logi application’s root folder. In a standalone environment, where all the requests are processed by the same server, this default cache configuration is sufficient.
In a load-balanced environment, centralizing the data cache repository is required.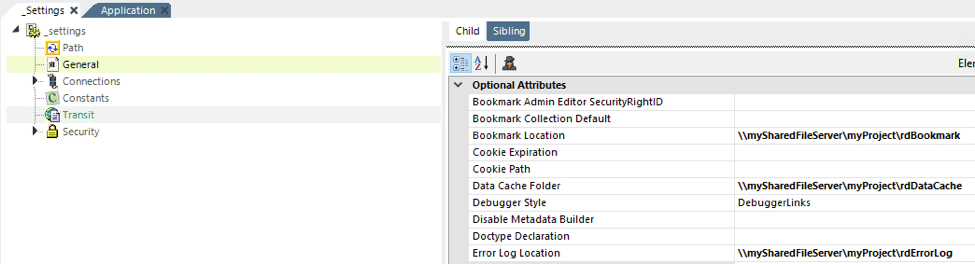
This is accomplished in Studio by editing a Logi application’s _Settings definition, as shown above. The General element’s Data Cache Location attribute value should be set to the UNC path of a shared network location accessible by all web servers. This change should be made in the _Settings definition for each instance of the Logi application (i.e. on each web server).
Note: “mySharedFileServer” IP/DNS address should be replaced later with file servers load balancer dns after completing the setup for load balancer below.
Creating and Configuring Your Load-Balancer
Overview:
You’ll need to set up load balancers for both the Linux file server and the Windows application/web server. This process is relatively simple and is outlined below, and in the Getting Started guide here.
Steps:
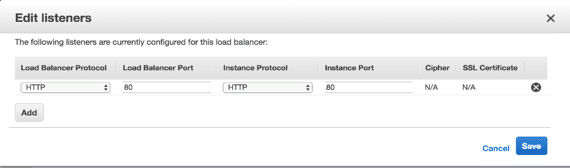
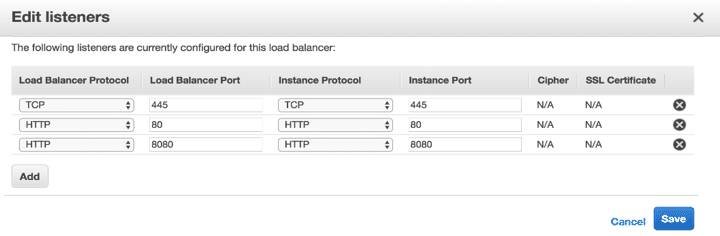
- Windows application/web servers load balancer:
- Use classic load balancers.
- Use the same VPC that our Ubuntu file server’s uses.
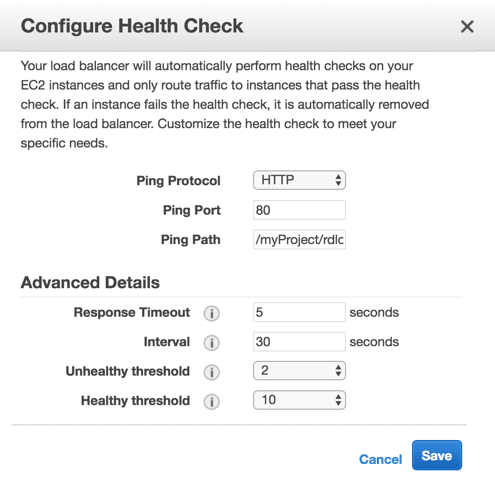
- Listener configuration: Keep defaults.

- Health check configuration: Keep defaults and make sure that ping path is exists, i.e. “/myProject/rdlogon.aspx”

- Add Instances: Add all Windows web/application servers to the load balancer, and check the status. All servers should give “InService” in 20-30 seconds.
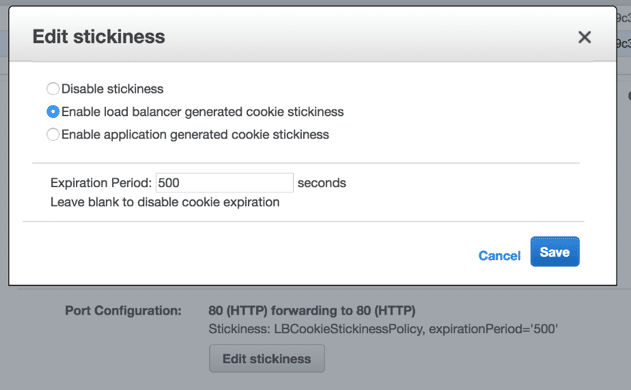
- To enable stickiness, select ELB > port configuration > edit stickiness > choose “enable load balancer generated cookie stickiness”, set expiration period for the same as well.

- Linux file servers load balancer:
- Use classic load balancers.
- Use the same VPC that the EFS volume uses.
- Listener configuration:

- Health check configuration: Keep defaults and make sure that ping path is exists, i.e. “/index.html”

- NOTE: A simple web application must be deployed to the Linux file servers, in order to set the health check. It should be running inside a web container like tomcat, then modify the ping path for the health checker to the deployed application path.
- Add Instances: Add all Ubuntu file servers to the load balancer, and check the status, all servers should give “InService” in 20-30 seconds.

Using Auto-Scaling
Overview:
In order to achieve auto-scaling, you need to set up a Launch Template and an Auto-Scaling Group. You can follow the steps in the link here, or the ones outlined below.
Steps:
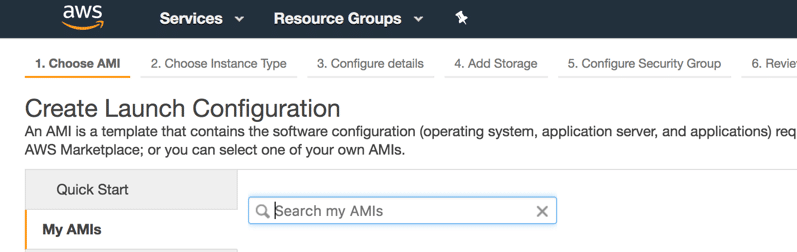
- Create Launch Configuration:
- Search and select the AMI that you created above.

- Use same security group you used in your app server EC2 instance. (Windows)
- Search and select the AMI that you created above.
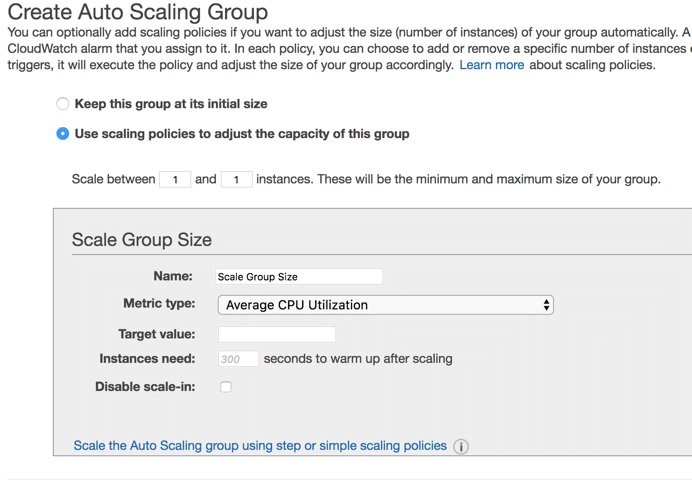
- Create an Auto Scaling Group
- Make sure to select the launch configuration that we created above.
- Make sure to set the group size, aka how many EE2 instances you want to have in the auto scaling group at all times.
- Make sure to use same VPC we used for the Windows application server EC2s.
- Set the Auto scaling policies:
- Set min/max size of the group:
- Min: minimum number of instances that will be launched at all times.
- Max: maximum number of instances that will be launched once a metric condition is met.
- Set min/max size of the group:
- Click on “Scale the Auto Scaling group using step or simple scaling policies”

- Set the required values for:
- Increase group size
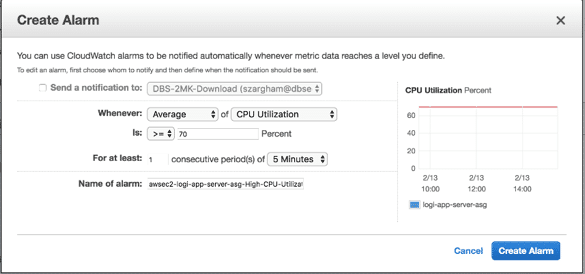
- Make sure that you create a new alarm that will notify your auto scaling group when the CPU utilization exceeds certain limits.

- Make sure that you specify the action “add” and the number of instances that we want to add when the above alarm triggered.
- Make sure that you create a new alarm that will notify your auto scaling group when the CPU utilization exceeds certain limits.
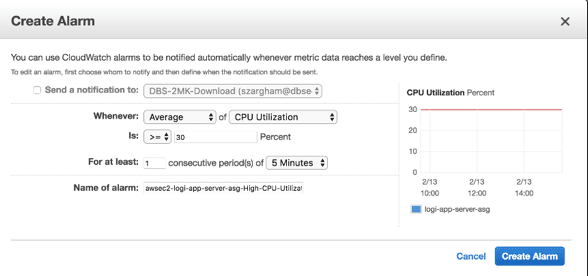
- Decrease group size
- Make sure that you create a new alarm that will notify your auto scaling group when the CPU utilization is below certain limits.

- Make sure that you specify the action and the number of instances that we want to add when the above alarm is triggered.
- Make sure that you create a new alarm that will notify your auto scaling group when the CPU utilization is below certain limits.
- Increase group size
- You can set the warm up time for the EC2, if necessary. This will depend on whether you have any initialization tasks that run after launching the EC2 instance, and if you want to wait for them to finish before starting to use the newly created instance.
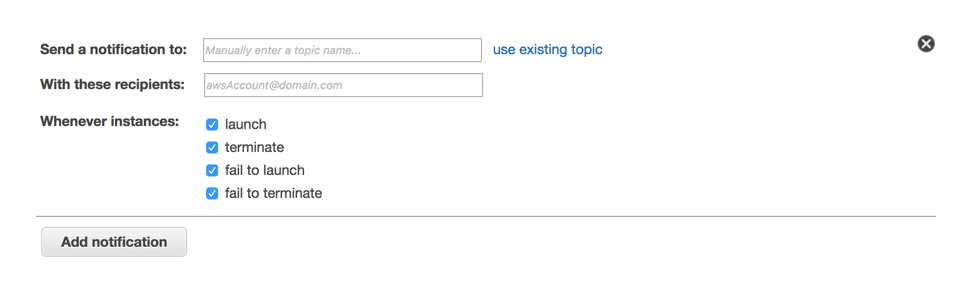
- You can also add a notification service to know when any instance is launched, terminated, failed to launch or failed to terminate by the auto scaling process.

- Add tags to the auto scaling group. You can optionally choose to apply these tags to the instances in the group when they launch.

- Review your settings and then click on Create Auto Scaling Group.

We hope this detailed how-to guide was helpful in helping you set up your Logi Application on AWS. Please reach out if you have any questions or have any other how-to guide requests. We’re always happy to hear from you!
References: