Recently, options for connecting to distributed computing clusters with SQL-on-Hadoop functionality have sprung up all over the world of big data.
 Amazon’s Elastic Map Reduce (EMR) is one such framework, enabling you to install a variety of different Hadoop based processing tools on an Amazon hosted cluster, and query them with software such as Hive, Spark-SQL, Presto, or other applications.
This post will show you how to use Spark-SQL to query data stored in Amazon Simple Storage Service (S3), and then to connect your cluster to Logi Studio so you can create powerful visualization and reporting documents.
Amazon EMR
Amazon Elastic Map Reduce is an AWS service that allows you to create a distributed computing analytics cluster without the overhead of setting up the machines and the cluster yourself. Using Amazon’s Elastic Compute Cloud (EC2) instances, EMR creates and configures the requisite number of machines you desire, with the software you need, and (almost) everything ready to go on startup.
Spark-SQL
Spark-SQL is an extension of Apache Spark, an open source data processing engine that eschews the Map Reduce framework of something like Hadoop or Hive for a directed acyclic graph (or DAG) execution engine. Spark-SQL allows you to harness the big data processing capabilities of Spark while using a dialect of SQL based on Hive-SQL. Spark-SQL is further connected to Hive within the EMR architecture since it is configured by default to use the Hive metastore when running queries. Spark on EMR also uses Thriftserver for creating JDBC connections, which is a Spark specific port of HiveServer2. As we will see later in the tutorial, this allows us to use Hive as an intermediary to simplify our connection to Spark-SQL.
Logi Analytics
Logi Anaytics is an integrated development environment used to produce business intelligence tools, such as data visualizations and reports. Within Logi Studio, one can create powerful and descriptive webpages for the displaying of data, while requiring relatively little production of traditional code, as the Studio organizes (and often develops) the HTML, Javascript, and CSS elements for the developer. Logi Anaytics can connect to a variety of different data sources, including traditional relational databases, web APIs, and – as this tutorial will demonstrate – a distributed data cluster, via a JDBC connection.
Creating a Cluster
First things first: let’s get our cluster up and running.
- For this tutorial, you’ll need an IAM (Identity and Access Management) account with full access to the EMR, EC2, and S3 tools on AWS. Make sure that you have the necessary roles associated with your account before proceeding.
- Log in to the Amazon EMR console in your web browser.
- Click ‘Create Cluster’ and select ‘Go to Advanced Options’.
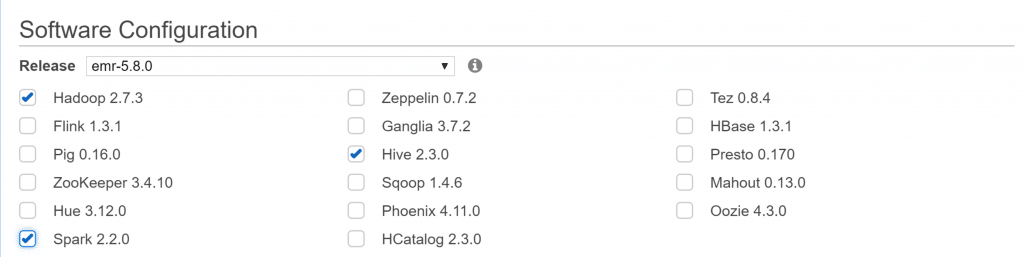
- On the ‘Software and Steps’ page, under ‘Software Configuration’ select the latest EMR image, Hadoop, Spark, and Hive (versions used at time of writing shown in image below).

- On the ‘Hardware Configuration’ page, select the size of the EC2 instances your cluster should be built with. Amazon defaults to m3.xlarge, but feel free to adjust the instance type to suit your needs.
- On the ‘General Options’ page, make sure you name your cluster, and select a folder in S3 where you’d like the cluster’s logs to go (if you choose to enable logging).
- Finally, on the ‘Security Options’ page, choose an EC2 SSH key that you have access to, and hit ‘Create Cluster’. Your cluster should begin to start up, and be ready in 5-15 minutes. When it’s ready, it will display ‘Waiting’ on the cluster list in your console.
Connecting via SSH
In order to work on your cluster, you’re going to need to open port 22 in the master EC2’s security group so you can connect to your cluster via SSH.
- Select your new cluster from the cluster list and click on it to bring up the cluster detail page.
- Under the ‘Security and Access’ section, click on the link for the Master’s security group.
- Once on the EC2 Security Group page, select the master group from the list, and add a rule to the Inbound section allowing SSH access to your IP.
- You should also allow access to port 10001, as that will be the port through which we’ll connect to Spark-SQL later on. You can also do this via SSH tunneling in your SSH client if you’d prefer.

- Open an SSH client (such as PuTTY on Windows or Terminal on Mac) and connect to your cluster via the Master Public DNS listed on your cluster page, and using the SSH key you chose during the configuration. The default username on your EMR cluster is ‘hadoop’ and there is no password.

Configuring Permissions
Some of the actions we’re going to take in this tutorial will require the changing of certain file permissions. Make sure that you complete these commands in your SSH terminal before you try to start your Spark service!
- Navigate via the cd command to /usr/lib/ and type the command ‘sudo chown hadoop spark -R’. This will give your account full access to the spark application folder.
- Navigate via the cd command to /var/log/ and type the command ‘sudo chown hadoop spark -R’. This will give your account access to modify the log folder, which is necessary for when you begin the Spark service.
Importing the Data into Hive from CSV
For this tutorial, we’ll be assuming that your data is stored in an Amazon S3 Bucket as comma delimited CSV files. However, you can use any Hive accepted format – ORC, Parquet, etc – and/or use files stored locally on the HDFS. Refer to the Hive documentation to change the SQL below to suit those scenarios; the rest of the tutorial should still apply.
- In your SSH session, use the command ‘hive’ to bring up the hive shell.
- Once the shell is opened, use the following SQL to create a table in the Hive metastore – no actual data will be imported yet:
“CREATE EXTERNAL TABLE tablename(values) ROW FORMAT DELIMITED FIELDS TERMINATED BY ‘,’ STORED AS TEXTFILE AT LOCATION ‘s3://bucket-name/path/to/csv/folder’;”
- Now that the table exists, use the following command to populate the table with data:
“LOAD DATA INPATH ‘s3://bucket-name/path/to/csv/folder’ INTO TABLE tablename;
- If you provide a path to a specific folder, Hive will import all the data in all the CSV files that folder contains. However, you can also specify a specific .csv in the filename instead, if you so desire.
Starting Spark-SQL Service
Luckily for us, Amazon EMR automatically configures Spark-SQL to use the metadata stored in Hive when running its queries. No additional work needs to be done to give Spark access; it’s just a matter of getting the service running. Once it is, we’ll test it via the command line tool Beeline, which comes with your Spark installation.
- In SSH, type the command: “/usr/lib/spark/sbin/start-thriftserver.sh”
- Make sure you’ve configured the permissions as per the section above or this won’t work!
- Wait about 30 seconds for the Spark application to be fully up and running, and then type: “/usr/lib/spark/bin/beeline”.
- In the beeline command line, type the command: “!connect jdbc:hive2://localhost:10001 -n hadoop”. This should connect you to the Spark-SQL service. If it doesn’t, wait a few seconds and try again. It can take up to a minute for the Thriftserver to be ready to connect.
- Run a test query on your table, such as: “select count(*) from tablename;”
- Spark-SQL is currently reading the data from S3 before querying it, which slows the process significantly. Depending on the size of your dataset, you may be able to use the command “cache table tablename” to place your data into Spark’s local memory. This process may take a while, but it will significantly improve your query speeds.
- After caching, run the same test query again, and see the time difference.
Downloading the JDBC Drivers
Spark Thriftserver allows you to connect to and query the cluster remotely via a JDBC connection. This will be how we connect our Logi application to Spark.
-
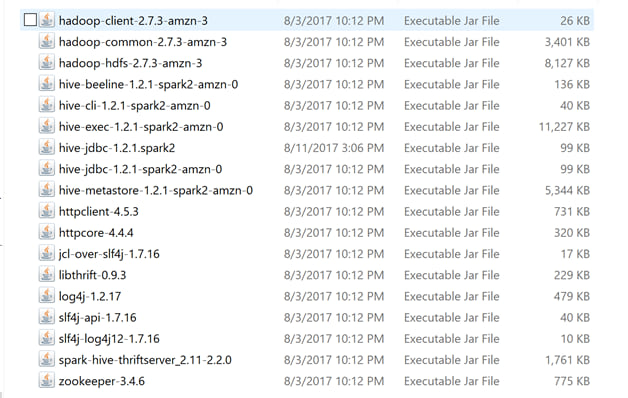
- Using an SFTP program (such as Cyberduck), connect to your cluster, and download the following JARs from /usr/lib/spark/jars:

- To test the connection, download SQL Workbench/J.
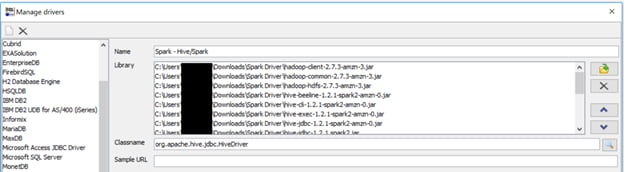
- Make a new driver configuration, with all of the above jars as part of the library.

- Format the connection string as: “jdbc:hive2://host.name:10001;AuthMech=2;UID=hadoop” and hit “Test”.
- If your Thriftserver is running, you should see a successful connection.
Connecting with a Logi Application
Because we’re using a JDBC connection, you’ll have to use a Java based Logi Application, as well as Apache Tomcat to run it locally. If you don’t already have it, download Tomcat, or another Java web application hosting platform.
- Create a Java based Logi Application in Logi Studio, with the application folder located in your Apache Tomcat’s webapps folder.
- Add all of the JARs from the previous section to the WEB_INF/lib folder of your Logi application folder.
- Within Logi Studio, create a Connection.JDBC object in your Settings definition. The connection string should be formatted as: “JdbcDriverClassName=org.apache.hive.jdbc.HiveDriver;JdbcURL=jdbc:hive2://host.name:10001/default;AuthMech=2;UID=Hadoop”
- In a report definition, add a Data Table and SQL Data Layer, connected to your JDBC connection, and querying the table you created in your cluster. Make sure you add columns to your Data Table!
- In the command shell, navigate to your Tomcat folder, and start Tomcat via the command: “./bin/catalina.bin start”
- Try to connect to your Logi webpage (usually at “localhost:8080/your-Logi-App-name-here”) and see your data.
Final Thoughts
Because EMR clusters are expensive, and the data doesn’t persist, it becomes important eventually to automate this setup process. Once you’ve done it once, it’s relatively easy to use the EMR Console’s “Steps” feature to perform this automation. To create the table, you can use a Hive Step and a .sql file containing the commands in this tutorial saved on S3. To change the permissions and start the server, you can use a .sh script saved on S3 via the script-command jar. More information on that process is listed here. Make sure that with the .sh script that you don’t include a bash tag, and that your end line characters are formatted for Unicode, instead of a Windows/Mac text document.
Another possible solution to the lack of data persistence is to use a remote metastore. By default, Hive creates a local MySQL metastore to save the table metadata. However, you can override this behavior and use your own MySQL or PostgreSQL database as a remote metastore that will persist after the cluster is shut down. This is also advantageous for the Logi application, as the local metastore – Derby – does not allow for concurrent running of queries. Information on how to configure your cluster to use a remote metastore will be coming in a second tutorial, to be published soon!
- Using an SFTP program (such as Cyberduck), connect to your cluster, and download the following JARs from /usr/lib/spark/jars: