
Spark SQL (Spark) provides powerful data querying capabilities without the need for a traditional relational database. While AWS Elastic Map Reduce (EMR) service has made it easier to create and manage your own cluster, it can still be difficult to set up your data and configure your cluster properly so that you get the most out of your EC2 instance hours.
 This blog will discuss some of the lessons that we learned when setting up our Spark. Hopefully we can spare you some of the time we experienced when setting ours up! While we believe these best practices should apply to the majority of users, bear in mind that each use case is different and you may need to make small adaptations to fit your project.
First Things First: Data Storage
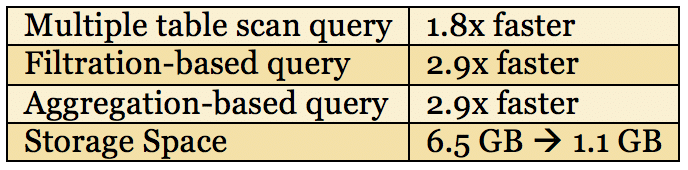
Unsurprisingly, one of the most important questions when querying your data is how that data is stored. We learned that Parquet files perform significantly faster than CSV file format. Parquet is a columnar data storage format commonly used within the Hadoop ecosystem. Spark reads Parquet files much faster than text files due to its capability to perform low-level filtration and create more efficient execution plans. When running on 56 million rows of our data stored as Parquet instead of CSV, speed was dramatically increased while storage space was decreased (see the table below).
Storing Data as Parquet instead of CSV
Partitioning the Data
Onto the next step: partitioning the data within your data store. When reading from S3, Spark takes advantage of partitioning systems and requests only the data that is required for the query. Assuming that you can partition your data along a frequently used filter (such as year, month, date, etc.), you can significantly reduce the amount of time Spark must spend requesting your dataset. There is a cost associated with this, though – the data itself must be partitioned according to the same scheme within your S3 bucket. For example, if you’re partitioning by year, all of your data for 2017 must be located at s3://your-bucket/path/to/data/2017, and all of your data for 2016 must be located at s3://your-bucket/path/to/data/2016, and so on.
You can also form multiple hierarchical layers of partitioning this way (s3://…/2016/01/01 for January 1st, 2016). The downside is that you can’t partition your data in more than one way within one table/bucket and you have to physically partition the data along those lines within the actual filesystem.
Despite these small drawbacks, partitioning your data is worth the time and effort. Although our aggregation query test ran in relatively the same time on both partitioned and unpartitioned data, our filtration query ran 7x faster, and our table scan test ran 6x faster.
Caching the Data
Next, you should cache your data in Spark when you can fit it into the RAM of your cluster. When you run the command ‘CACHE TABLE tablename’ in Spark, it will attempt to load the entire table into the storage memory of the cluster. Why into the storage memory? Because Spark doesn’t have access to 100% of the memory on your machines (something you likely would not want anyways), and because Spark doesn’t use all of the accessible memory for storing cached data. Spark on Amazon EMR is only granted as much RAM as a YARN application, and then Spark reserves about one third of the RAM that it’s given for execution memory, (i.e. temporary storage used while performing reads, shuffles, etc.). As a rule of thumb, the actual cache storage capacity is up to 1/3 of the total memory in your RAM.
Furthermore, when Spark caches data, it doesn’t use the serialization options available to a regular Spark job. As a result, the size of the data actually increases by about two to three times when you load it into memory. Any overflow that doesn’t fit into Spark storage does get saved to disk, but as we will discuss later, this leads to worse performance than if you read the data directly from S3.
Configuring Spark – The Easy Way and the Hard (the Right) Way
The Easy Way
Spark has a bevy of configuration options to control how it uses the resources on the machines in your cluster. It is important to spend time with the documentation to understand how Spark executors and resource allocation works if you want to get the best possible performance out of your cluster. However, when just starting out, Amazon EMR’s version of Spark allows you to use the configuration parameter “maximizeResourceAllocation” to do some of the work for you. Essentially, this configures your cluster to make one executor per worker node, with each executor having full access to all the resources (RAM, cores, etc.) on that node. To do this, simply add “maximizeResourceAllocation true” to your “/usr/lib/spark/conf/spark-defaults.conf” file.
While this may be an ‘acceptable’ way to configure your cluster, it’s rarely the best way. When it comes to cluster configuration, there are no hard and fast rules. How you want to set up your workers will come down to the hardware of your machines, the size and shape of your data, and what kind of queries you expect to run. That being said, there are some guidelines that you can follow.
The Right Way: Guidelines
First, each executor should have between two and five cores. While it’s possible to jam as many cores into each executor as your machine can handle, developers found that you start to lose efficiency with a core count higher than five or six. Also, while it is possible to make an individual executor for each core, this causes you to lose the benefits of running multiple tasks inside a single JVM. For these reasons, its best to keep the number of cores per executor between two and five, making sure that your cluster as a whole uses all available cores. For example, on a cluster with six worker machines, each machine having eight cores, you would want to create twelve executors, each with four cores. The number of cores is set in spark-defaults.conf, while the number of executors is set at runtime by the “–num-exectors #” command line parameter.
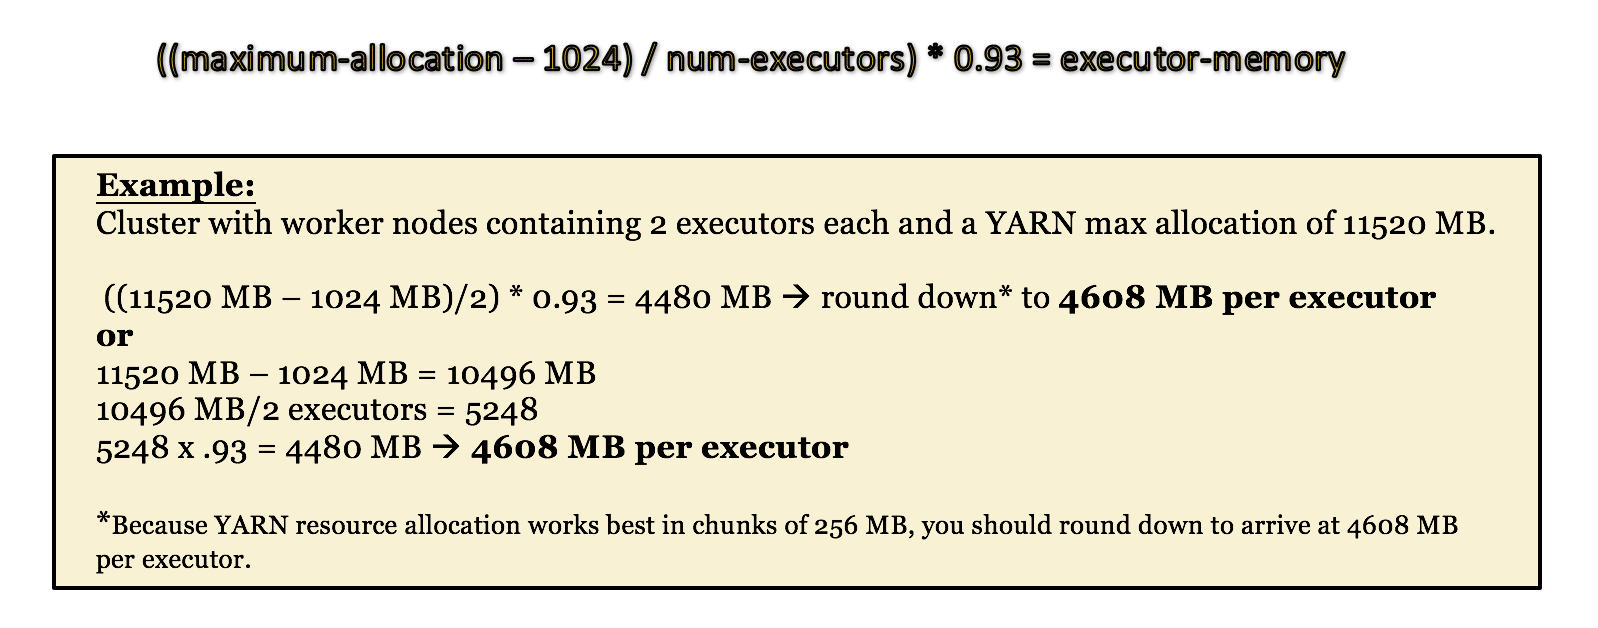
Memory is the next thing you must consider when configuring Spark. When setting the executors’ memory, it’s important to first look at the YARN master’s maximum allocation, which will be displayed on your cluster’s web UI (more on that later). This number is determined by the instance size of your workers and limits the amount of memory each worker can allocate for YARN applications (like your Spark program).
Your executor memory allocation needs to split that amount of memory between your executors, leaving a portion of memory for the YARN manager (usually about 1GB), and remaining within the limit for the YARN container (about 93% of the total).
The following equation can be used for shorthand:
One Last Thing – the Spark Web UI
Earlier in this post we mentioned checking the YARN memory allocation through the Spark Web UI. The Spark Web UI is a browser-based portal for seeing statistics on your Spark application. This includes everything from the status of the executors, to the job/stage information, to storage details for the cluster. It’s an incredibly useful page for debugging and checking the effects of your different configurations. However, the instructions on Amazon’s page for how to connect are not very clear.
In order to connect, follow Amazon’s instructions – located here – but in addition to opening the local port 8157 to a dynamic port, open a second local port to port 80 (to allow http connections), as well as a third local port to port 8088. This port – the one connected to your cluster’s port 8088 – will give you access the YARN resource manager, and through that page, the Spark Web UI.
Note: the Spark Web UI will only be accessible when your Spark application is running. You can always access the YARN manager, but it will show an empty list if there is no Spark application to display.
Now it’s Your Turn!
Unlocking the power of Spark SQL can seem like a daunting task, but performing optimizations doesn’t have to be a major headache. Focusing on data storage and resource allocation is a great starting point and will be applicable for any project. We hope that this post will be helpful to you in your SparkSQL development, and don’t forget to check out the Spark Web UI!